Wednesday, August 31, 2022


 The Support Foot


        Your throw's success or failure depends upon the position of your support foot.        

 Fix the foot! 

    The support foot is the foundation of all throws. If I watch you do a throw that isn't working, the first thing I look at is your support foot placement. That is the primary problem the vast majority of the time. It might be only one of more, but unless it's fixed, nothing else is going to matter; and if it is fixed, it can often go a long way toward fixing the other concerns. 

     A misplaced support foot destroys kuzushi. Kuzushi works in concert with the placement of your support foot. If they are not in harmony, the kuzushi vanishes. 

     The support foot is the place from which power is driven as the throw goes from tsukuri to kake. It is also the place where tori's body is initially correctly positioned to maintain balance throughout all parts of the throw's progression. 

     Try this. Do a right hand o-goshi just up to the point of beginning the kake, the lift and rotate. Lift up your left foot. You will discover that bringing uke over is close to impossible. Lift up your right foot, however, and your left leg will drive the throw successfully. All throws have a dominant power leg, even those that seem to have both feet evenly on the ground. 

     Every throw has a place where that power foot should be. You probably know the spot. Then along comes randori and the foot just doesn't get there. 

  • The first step into a throw is the last step of walking. That sets up the ability to put the support foot where you want it.
  • In uchikomi and nage komi, focus on that spot for every repetition.
  • In randori, try to make this be the main thing you do. Forget about the rest of the throw (assuming you know it to some degree of familiarity).

     This becomes both the simplest and the most challenging of fixes. It's your foot! Unless uke has a prehensile tail reaching down and controlling it, you can put it anyplace you want. However, you must do more than simply "want" to. There are reasons you are putting it in the wrong place. We don't need to examine them. They are gremlins, and you cannot kill them with wishful thinking. We have to know they exist powerfully and they always try to return.

    Gremlin killer: Single-Minded Uchikomi and Single-minded Moving Uchikomi

    Gremlins don't just go away. They have to be intentionally and totally destroyed. Knowing a needed fix and saying, "Oh, okay. I'll fix that" won't. I've seen gremlins seem to be conquered, be gone for months, then return with a vengeance. I've also seen someone fix a problem on the spot, and then half an hour later it returns. You sometimes hear a judoka, often a sensei, say, "In judo, your toughest opponent is yourself." It's almost a shrug-it-off cliché. Support foot gremlins are among those personal opponents. 

     Practice makes permanent. Be careful, because this also means that while doing uchikomi to correct your foot placement, any mistakes you are making elsewhere in the practice will become more concrete. All too often, uchikomi becomes a mindless repetition of what we think the throw should be, and we make bad technique more permanent. 

        This is why single-mindedness is important. Perhaps the most challenging part of learning any physical skill is focus. There are separate methods out there to supposedly help you concentrate better. Here's one you might like. In uchi komi, have uke say "Foot!" to you before each entry. Also, if uke knows where you are trying to put your foot, uke can tell you if you are getting off target. If you don't have an uke doing it, do it yourself.

    Often, when watching a high level Japanese training session, the uchikomi features a strongly stomping first foot step by all the trainees. I recommend doing the stomp. 

     More Than Just a Spot

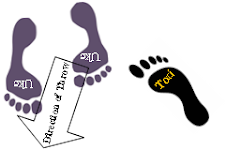
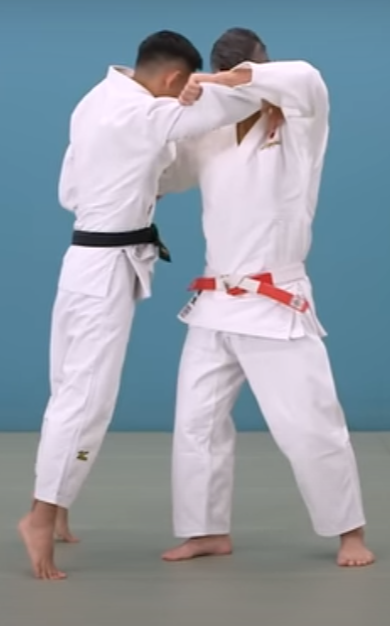
    Support foot placement is more than just a place on the mat. Correct placement also means the direction in which the toes point. Uchi mata and sasae tusurikomi ashi are special examples of toe misdirection, along with position error. FYI - Study how they are done in Nage no Kata. Look at the support foot, where it is and the angle its big toe points relative to the central action of the throw. If you don't do kata, then watch a world class demonstration and see it that way. Actual experience is a highly preferred way to appreciate this.

    In right uchi mata, at kake, the support toes should point to what would be tori's front, not to tori's right. In practice, an even larger turn of the support foot to the left is recommended, because that will compensate for when the foot tries to point to the right.  

    In sasae, the support foot should be outside of uke's non-propped foot line and the toes pointed inward, not on a line parallel to what would be the "railroad tracks". 

    In both cases, the Nage no Kata foot placements are excellent examples.  
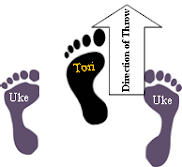
        Uchi Mata             


                                                        Sasae Tsurikomi Ashi

(The purpose of these illustrations is to show placement angles. As to specific, exact, spot on placements, let's please not quibble.)

    Another common foot flaw

        Flat footed endeavors cause the knees to be vertically back (behind) the toes, and they should be on a dropline position ahead of them. Flat footedness also takes away final lifting and rotation action, which in turn eliminates a couple of dynamic inches of vertically forward thrust. Almost all, if not all throws should put tori in a position at tsukuri to kake where the knees are in front of the toes, the chest in front of the knees, and the nose in front of the chest. Any other position creates physical counter leverage. 


    Watch it Done Right

          Watch the successful judoka in your own dojo, or look on the Internet. 

Sadly, there will not likely be any discussion of foot placement. The best throws are those that require no hopping and no head diving. If a hop works it is too often because of an eventual and unintentional correct support foot placement during the hopping. Or, it succeeds because it wins by attrition. Head dives are a compensation for a lack of many bio-physical throwing essentials, and chief among them is support foot placement. Many judoka practice doing head diving throws, and this is a subject for another blog. My personal opinion is that the online high level competition judo coverage glorifies it. For now, suffice it to say that this sensei considers this dangerous and bad judo. Rolling over on uke when the throw is so dynamic that the momentum forces this, that is okay. Using head diving to make the kake work is not. 

In Randori

    A major objective of randori should be to work on things that need improvement. Here's an idea. Get someone to video your next few randori sessions from your knees on down and watch to see where you put your support foot for each attack. Look for nothing else. Isolate. For best results, be sure your sessions have several attacks. 

    Also, try this. Rather than have a specific throw in mind, just have a specific foot placement in mind, and let the throw follow. 

        It's Your Foot - Train it

    Sometimes, it seems our feet have little contrarian brains of their own. They just do what they want to do, no matter that you know better. You are unlikely to achieve total foot control quickly, because this is a gremlin that keeps wanting to come back tenaciously. Be master of your own feet. 

    We should never have to say, "I can't do this throw!"

    "Why not"

     "My foot won't let me."

      If ever your throw is admired by another judoka and you are asked your secret, you can smile slyly and say, "It's simple. I trained my foot." (Do not add "Grasshopper" to your reply.)




Tuesday, August 16, 2022

True Tipping Point

            So, you'd like to throw like legendary Kyuzo Mifune.            

            Don’t mistake the following for theory. It is something that you need to apply to your randori, and that you perpetually practice.


If you want to throw somebody with a really great throw, the best option is a judo throw. Because, to just do a “throw” you could simply pick somebody up and throw them across the room. Or, you could heft the victim onto your side, then fall on them, dragging them down under you. Those aren’t judo throws. They are just throwing. 


A judo throw requires a tipping point, plus a fulcrum, over which the uke’s body rotates and causes uke to land on the back.  Shiai points can be gained by throws that aren’t technically judo throws, and far too often are. In fact, many pictures are taken of these as examples of “dynamic” judo. These are not the goals of a true judoka.


Watching judoka practice a throw and not have success often shows the major issue involving tipping points. A successful judo throw is an uninterrupted single action that contains three essential elements. What we see instead is tori stopping at the moment between what should be the tsukuri and the kake. Then, often, without any kuzushi in the action, some lifting power is brought into play, and in spite of the results, we no longer technically have a judo throw.


This tells us the throw attempt’s failure is due to either missing kuzushi or improper fulcrum point placement, often both.


If at this point you might be thinking, “Duh! Everybody knows this.” If so, then let’s ask why these things are a perpetual cause of throw attempt failures.


     Let’s digress. Take a glass and set it on a table. Nudge it closer and closer to the edge, until it is almost ready to fall off the table. There is a position at which the glass is on the table. If nothing changes, it will stay there forever. There is an almost immeasurable point where if the base of the glass is moved farther off the edge, or if the top of the glass is leaned over the abyss, the glass will fall. It won’t stay suspended in space. This is when the throw should happen, as irrevocably and instantly as the glass tumbling off the table. It should take place at the tipping point.


The continuous and contiguous action of the three elements has stopped at the moment when the third element should have begun. Often, at this point, the tori will make an extra physical effort to complete the throw. It could be bending forward at a ninety degree angle. It could be trying to lift the uke up off the mat. In randori or shiai, it could be head diving. It is no longer a judo throw, but just a throw done during a judo activity.


            When kuzushi meets tsukuri, the tipping point has happened and kake is in progress. There should be no discernable time between that moment of connection and the accomplished throw. It should be like stepping off a cliff.


All too often, this is where we see physical strength and / or added body bending happen.  Once into the actual kake, it can have its own problems, chief among them the discontinuation of the pulling hand. This all for later.


When doesn’t a tipping point tip? When the fulcrum point is not harmoniously conjoined with the movement of the off balanced object.


When watching a throw, we see the big action, the kake. When learning a throw, we get involved with the new architecture of it, the form. Kuzushi is mostly just pointed out and then demonstrated as a pull or a push in a certain direction. What we don’t see is that when kuzushi and tsukuri have a rendezvous, the throw is happening at that instant. The amount of time involved is zero. It is like stepping off that cliff. The tipping point has arrived and the result is kake. There are no pauses, no action breaks, no grunts, bends, butt thumps or face plantings. Uke is airborne. 


Kyuzo Mifune is considered the epitome of judo technique. There used to be a quip that if you blinked one eye while doing randori with him, you were off balance to that side. It is important to be familiar with the Mifune videos of his randori action and with his instructional videos.


At the risk of blasphemy, I am going to say that some of Mifune's throwing examples show bad form. If you try to copy his techniques and do the throw forms and the kake as he does them, you won't in these cases get good results. In spite of this, his throws are still amazing.


That is because his  judo throws are based upon his super mastery of kuzushi. He owns the tipping point.  The tipping point isn't wimpy. What is the ultimate tipping point? It is when the aforementioned glass on the table's edge is at the critical moment of tipping over, is going to go, unless something intercedes. In a judo throw, it does go, because a fulcrum point is what shows up to create the rotation.


If you will stand on the very top of your tippy-toes of your right foot, I will throw you with any front right throw I want, and you won't be able to stop me. If you can step forward, I haven't shown up in time. If you can plant your foot back down, I didn't perpetuate the pull. Here is Mifune showing the kuzushi for ashi guruma. He isn't exaggerating. This is what he actually does.


    Uke is one straight line, from big toe to top of the head. Look at uke's left foot and leg. They no longer can play any part in uke's defense. Uke is like a pencil balanced on its point.

    Here, Kosei Inoue is teaching his famous uchi mata. This is his idea of how the kuzushi should look, and what he does to make his work. You can watch it all at  https://www.youtube.com/watch?v=Lu9hhbuOb-U


    This throw is over. Your kuzushi must be this blatant. You will have to be able to show up with the speed and timing such that uke cannot recover. However, if you only show up with speed and power, it is likely you will not get a throw.

To Practice:

• Select your throw and know what direction is its off-balancing goal.

• Create a major tipping point and maintain it.

• Step in and do the throw, without losing the tipping point.

• Walk around and try to figure out how to create that tipping point.

    If you watch Mifune, Inoue or other great throwers in action, you'll see that they use a pre-established pattern of set-up steps prior to application of kuzushi.


If you don't establish kuzushi, don't do the rest of it. Not to be too blunt, but if you don't establish kuzushi, there isn't any "the rest of it". 


Here is a bonus tip. The battle for gaining and maintaining kuzushi is what nage no kata is very much about. If you can find a sensei who teaches it that way, it could be a worthwhile endeavor.


Add the endeavor for better and better kuzushi and it will make your judo work.


Tuesday, July 19, 2022

Tai Otoshi Inner Secrets 1 & 2


Tai Otoshi Inner Secrets 1 & 2

If you love tai, I'm hoping to add to the romance. If you don't feel you quite "get" tai, I'm betting you will feel much stronger about it after trying the first "Inner secret".


Sometimes, actually quite often, inner secrets are things we don’t even know that we know. During the last few years, I’d realized my old tai-otoshi was somehow gone. Something was missing. I could do a respectable tai-otoshi, and what I taught to my students worked well for them. There was no glaring problem, except that I knew something was missing. Then, I discovered an inner secret about my tai-otoshi after a sixty - plus year acquaintance with it.


After about three or so months into my beginning judo, I’d discovered my tokui waza. Or, as is truly the usual case, it discovered me. I nowadays communicate with three of my former Mankato State College Judo Club teammates and it has been remarked, from time to time, that they recall my tai-otoshi as a formidable throw. This, however, aroused my curiosity as to why it had worked so well. When a photo from long ago was recently sent to me, I was immediately awakened by something obvious.


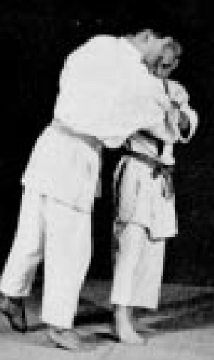
This is the B&W photo of me at Mankato State Judo Club sometime around 1961 throwing my sensei, Paul Sheehan, with tai-otoshi. Below that is Kazuo Ito demonstrating his tai-otoshi. Ito became 9th dan and was the favorite student of legend Kyuzo Mifune. People used to say, when asked how Mifune did something, "Ask Ito. He will show you." If at this point you don't yet know who Mifune was, your most immediate next judo activity could be to check him out. It turns out that I was doing my tai just like Ito did it. (I love it when that happens.) Nice to know I'm in good company, tai-otoshi-wise.


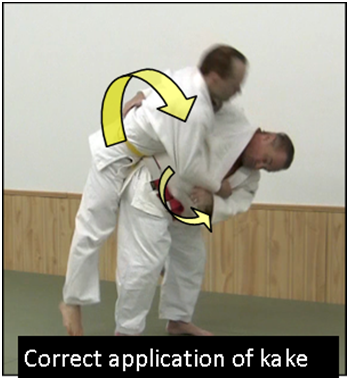
            As you've possibly figured out, the lift of my collar hand is the secret. Not only is it in this position, it got there as the predominant "power" driving force throughout. It is the tsurite, the "lifting hand".


Quite often, the emphasis is put on the sleeve hand’s lift-and-pull. Perhaps that's because it is more noticeable when watching the throw. Additionally, the sleeve hand pulls in the direction of the kuzushi, so it is obviously very important. That is when the collar hand, the tsurite, gets overlooked, is given less emphasis, becomes a secondary consideration.


Thus, many new tai-otoshi learners allow the collar hand to lag behind, getting it behind their own shoulder. It’s a very common mistake. It can lead to shoulder damage, too. It also robs the throw of a huge amount of the correct use of force. Worse, a weak collar hand allows the force of the throw to come around and back into tori, moving it out of the zone of force that goes in the direction of the initial kuzushi. Go beyond the admonishment to not leave it behind; start with it.


In the pictures, it might also seem my left hand has lapsed downward, but it is actually completing a circle that was initially upward and outward toward uke's right front corner. Via the arrows, you can see that it and the right hand are making a large, congruous circle.


To help get the collar hand working right, It is a clever trick to think of the collar hand beginning the throw. Use it as an initiating action. Give it as much of a role in creating kuzushi as the sleeve hand gets. Do that, and it won't lag behind. Actually try it several times, until it feels like a powerful part of the throw.


I can even now recall what the correct use of the collar hand felt like when a sandan from Japan, Ken Ichiyama, threw me with his monster tai-otoshi. Back then, there were often Grand Champion divisions added to our local shiai, Ken would win the division above me and we’d be paired to compete. We bowed, took grips, and I think it took him about thirty seconds to nail me with a lightening tai otoshi.


After my loss to his devastating tai-otoshi, I went back to my dojo and tried to devise a way to combat this. My sensei suggested I could jump over Ken’s blocking leg. So, I practiced this many, many times. The next time we met. I was ready. This time I had the answer! Ichiyama came snapping in for his tai, I was ready. I jumped over his leg. He threw me faster and harder than the last time. As I was getting up, I heard him say, “Thanks for jumping.” I can viscerally recall the feeling of that collar hand owning me every millisecond of the way. I know it now, but didn’t sort it out back then. Ironically, I was using my hand the same way in my own tai-otoshi throws, as the picture shows. That experience also brought home to me why tai is considered a hand technique.


In order to accomplish this and be sure of its efficacy, the collar hand must be part of the very beginning of the throw. It isn't a high collar grip, just standard. Tori should feel as if it begins early, almost triggers the throw. It must get above tori, while tori simultaneously gets below it (otoshi). When you try starting by using the sleeve hand for your primary lift and pull, and it seems physically challenging, it is because the collar hand isn’t right there in the action at the start. 


If you go watch tai otoshi expert Neil Adams teach "Korean" style tai otoshi, you'll see what I'm talking about.


Here is something you might try in practice. Do the throw without the sleeve hand and make the collar hand do it all, being sure to keep uke's body from touching yours. This will give you a feel for how the collar hand works, and it will assure that you continue the throw in its intended front corner kuzushi direction. Of course, the sleeve hand can add to the rotation near the end, but you can start with it not holding on at all; or, if your partner is so inclined, uke can finish it with a front roll fall and no sleeve grip is necessary.


Another idea for you. Think of the hand moving the same way it would if you were going to do a front roll fall, the hand starting at your shoulder. In the picture, you can see that if I just let go of my right hand I could go into one. (The picture feet are, of course, reversed from the basic zempo kaiten ukemi)


Tai is a te-waza, a hand technique. It is said that Kano used to do it without the blocking leg. As is often the case, students look at the big picture and miss the underlying details. We see the leg blocking and creating the completion of the throw, and focus on that aspect. This distracts from looking more closely on the "te" part, studying it as the primary ingredient, then seeing the leg action as secondary. We tend to do this isolation of the obvious with almost all throws, and it is a natural thing to do. We see the "big" action, and the smaller yet critical action escapes us.


There is the second secret that this tai otoshi analysis offers, as it informs us regarding all wazas. Look for the fundamentals; see the devils in the details. For example, think of all the throws where the leg sweeps; o-soto, uchi mata, harai goshi, o-uchi gari, and so on. We are totally absorbed in the big sweeping leg action; however, there is detail action before those sweeps and reaps, and without it, they don't do anything.


For tai, focus on the te-waza part and get the kuzushi and the blend of that into movement which takes uke beyond the point of recovery. Then show up with the leg.


Among the many things that can be done to assure a good tai-otoshi, I’m hoping the added "inner secrets", this discovery of my own early days unconscious competence, and now conscious competence, will be of value to you.


Remember to always ask, "What is making the judo work here?"


Monday, July 4, 2022

More Pull - Get Lower


More Pull - Get Lower


    “More pull. Get lower.” Perhaps you've heard these admonishments. Little did I know, in my early judo days when first I heard them, how critically important the advice was to successful judo throwing. The one we care about here is the first one, “More pull”.  

    I had to learn the appreciation of this the hard way. When a high grade Japanese sensei with whom we often trained gave this command, we pulled harder (while also trying to get lower at the same time). The sensei would come around again, stop, observe with inscrutable scrutiny, perhaps with a head nod or two, then say, “Okay, but more pull!” I pulled harder, and harder, and thought my fingernails might get ripped off. Then, a while later when he came around again, it was  More pull!  (“Wash, Rinse, Repeat”). There was no satisfying this man. Obviously, we weren’t putting enough beef into it. Or, so we thought. 

    Some years went by and I had an epiphany. So I asked my visiting Japanese friend, Kazuo Hirayama, Shorinji Kempo master and judo nidan, “When the Japanese sensei tells us ‘More pull!’, does that mean ‘Pull harder’ or does it mean, ‘Pull more’, as in don’t stop pulling?” I have no idea how difficult it was for Kazuo to make his tone and expression neutral and allow me to save face, having asked a question with such an obvious answer. 

“Don’t stop pulling”, he said. 

 Yet, we do. 

    When we do, the flow of the throw, and most often the complete throw, is abated. This is where throws get stuck. The brakes slam on. Dead stop. You’ve done everything up to this point, the kuzushi, the fitting in with good form, and for some reason the throw stops dead. Maybe, at this point, you can horse it over, but if you do, it’s no longer a judo throw, just a throw being done in a judo class. 

    As a sensei, it took me way too long to realize this was where my students were having a problem. I’ve come to call it the “two part throw effort”. Take time to watch others in randori and see how often a failed throw also has a dead pulling hand (the sleeve hand, hikite). 

    Test it yourself on a familiar front throw. There’s a good chance your form will be good, so if you actually used kuzushi, and focused on more pull as you do the throw, you will feel a smoother, effortless throw. If, on the other hand, when attempting your throw, you feel you have to bend over really big, face looking down to the mat, it means you didn’t do more pull. At the point where you want to bend over so as to use your butt to throw, pull! (Better late than never.) If you are bent over and looking straight down and see the mat instead of uke, then you strain and uke shows up on the mat, but that’s not a judo throw. Other throws that are not over the back or hip types sometimes require some manner of “second effort”. All “hopping” throws, like o-soto-gari and uchi mata, can of course be done without hopping or driving to the ground. If the only way you can make them work is by adding the second effort, you don’t have the throw skill down. Probably, adding continued pull will make a big difference.  It’s not entirely your fault. Much of this has to do with what happens when we first learn a throw. Throws have their own unique form. It is making this form that becomes our first goal. We have to make our throw look like the throw. Therefore, we have “check” point. 

    We step in and check it out. If you see a picture of a throw just before it is applied to kake, you can identify it. When we learn to complete a throw, this is where we tend to stop and examine all the pieces once again to see if they are in the correct place. We fit in, we stop and do a pre-flight check, then launch. This is the time when the “judo” goes away. There should be no pre-flight check in the successful judo throw. If that stoppage of pull exists, the launch effort then becomes the application of force at the point of critical mass. For example, seoi nage. The stoppage makes emphasis suddenly go totally into the forceful use of the butt, created by a strong bending over at the waist and a forcing backward of the butt. This actually creates  counter leverage and the need for more force. All too often, uke’s feet are solidly on the ground when this happens. (That’s because the stopping can cause uke’s balance to return and the kuzushi is lost.)

    Just before all the “Atomic Butt” action, the pulling stopped. Tori was in a seoi nage pose position. The throw becomes a two part action. When the pull stops, the judo stops. In teaching throws, when I see this, I force students to step in and only focus on continued pull of the hikite (usually the sleeve hand). I don’t let them stop the action at any time, forcing them all the while to keep pulling. That sometimes means standing there coaxing, “pull!, pull!, pull!, pull! From start to finish.  Sometimes, in the stuck position, just when everything is telling you to bend over, try just pulling, and very often the throw works from that alone. Once the throw is in the “We have lift-off” mode, uke’s feet just coming off the mat, the Atomic Butt, or the sweeping / reaping leg can come into play. 

Ways to Make Your Judo Work

  • Mentally, see the whole throw at the very beginning of your throw. Our early judo experience compels us to think that just getting in is all that matters, because it’s the most challenging. When we get in, there comes a “What’s next?” moment. That is where we’d stop and check to see if the form was correct. Don’t stop in your pre-throw visualization. See it all, from start to finish. Try to imagine how it feels.  Then try it. 


  • Uchi komi  is good for kuzushi  and tsukuri. It isn’t as functional for training the tsukuri to the kake. Some Sensei have pointed out that it actually trains the judoka to stop; so don’t let it. Do throwing practice to offset that. A “Step in, step in, throw” drill is a good way to combine the two. 


  • Do a lot of nage komi. It is important to do complete throws. Put emphasis on the continued pulling as its own task. Focus on the hikite pull (pulling or usually sleeve hand). 
  • Keep saying  “pull!, pull!, pull!, pull!  to yourself. 


  • Make this a conscious effort, a major part of your next dozen or so practices. It feels so good when it is working for you that it won’t be long before your throws will begin to want to just do it.


    Here, in the photos from Tom Crone’s Judo Basics, is hikite doing its job. As the pull continues across, it does not suddenly drop to tori’s belly. It keeps pulling. In frame 2, the uke is already going around and over. You can see the continued pull by looking at the stress lines on uke’s sleeve in the triceps area. (Of note: Tori is not bent over at the waist but angled at the hip. It is uki goshi, and the continued pull at this point is already bringing uke over. For all intents and purposes, this throw is over. We have lift off!)

    Many think the idea is to get in and lift uke up, then dump uke onto the mat. However, that causes a stoppage in the process if the thought is two-part. The best idea is to think of throws as singular circular actions, with uke being brought around, not just up, The arrows in the above photo show this. This continued circular idea is what Kyuzo Mifune emphasized. 

    This won’t do you any service if you only try it a couple of times but don’t make it a complete part of your judo. This is where the mental part of judo comes into play. We hear about “focus” in martial arts study, and I think our definition should include what I am going to call “long-range focus”. Go beyond focusing on the task at hand, of the moment, and focus on focusing the next time. How? before you get on the mat, and ask yourself what you will focus on. Do this many times, and again as needed. Ask it just before or as you bow onto the class area. Focus is the simplest and possibly the most difficult aspect of any learning process. If you focus on “More Pull!”, it will make your judo work.